This page refers to Labeljoy 5, which is not the latest release!
Please upgrade to Labeljoy 6 to get the latest version of the software with all its amazing features, or go to Labeljoy 6 user guide if you already own it.
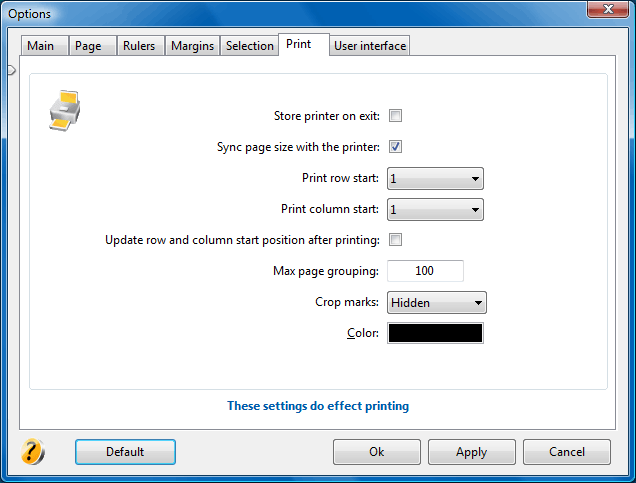
This tab enables you to define printing options. These settings affect label printing.

STORE PRINTER ON EXIT SYNC PAGE SIZE WITH THE PRINTER PRINTING START POSITION
|
Note:
The printing start position can also be set using the mouse. See the setting the print start position
topic.
MAX PAGE GROUPING
Windows
cannot handle printing jobs in excess of 2 GB. In such circumstances, a system error will occur. To avoid this, Labeljoy sends pages to the printer in groups, comprised of a certain number of pages. The option max page grouping
enables you to define the maximum page quantity
to be sent to the printer in a single print job (Min 1- Max 999).
This option is useful when sending to the printer
a high number of pages,
and when the contents are particularly heavy in graphic elements, such as images. As an example, if the current job is made up of 250 pages and the setting here is 100 (default), the job will be sent to the printer in 3 different phases: 100 pages, 100 pages, and 50 pages.
All pages will still be printed. They are
simply grouped in a way that will be interpreted by Windows as 3 separate print jobs.
Note:
In case the print job is actually split into more than one group because it exceeds the option set here, print cancel will only affect the group currently being printed.
CROP MARKS
Crop marks can be optionally printed on each page in case it is necessary to cut the printed sheets. The combo box Crop marks
enables you to set the way crop marks are printed:
- Hidden: crop marks are hidden and do not get printed.
- Fixed length: crop marks are printed, and their length is fixed at 1 inch (2.54 cm).
- Margin length: crop marks are printed, and their size is dependent on the outer margins defined in layout from.
- Page size: crop marks are printed using the whole page width and height.
Note:
To ensure that the option Margin length produces a visible effect during printing, it is necessary that the outer margins, set in the layout dialog box, are large enough to exceed the printer margins. Otherwise some crop marks may not be printed.
You can define a color that will be used to print crop marks by clicking the Crop marks color box.
