The
layout dialog box
enables you to enter the parameters that define
paper size,
label size
and their coordinates on paper. In the right side, a preview
is visible that shows how changes affect the layout on paper.
Note:
The changes made here to paper size and orientation will also affect the current printer settings, depending on the Synchronize page format
setting in the Print
tab of the Options
dialog box.
In the event the selected printer does not support the
newly defined layout settings, the data shown on screen may not print correctly.
In case you need to change the printer paper size, it is strongly suggested you use the
advanced printer settings
dialog box.
The dialog box contains 4 tabs.
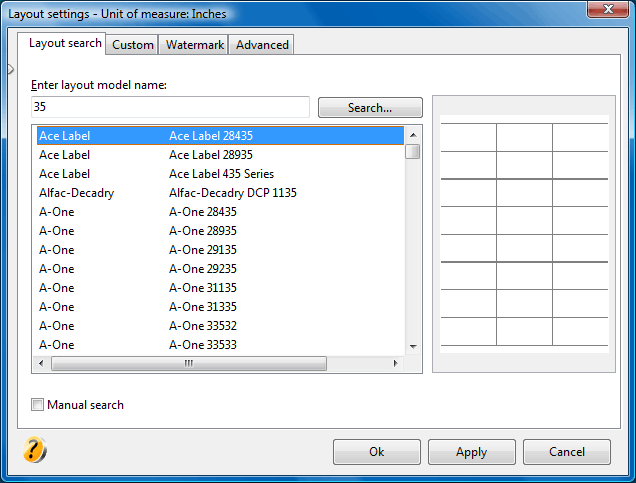
The first tab, Layout search, enables you to search for existing layout file inside the Layout folder in Labeljoy's installation path.
In the Enter layout model name text box, enter a text to search for in the file name. For example, if you need to find all the layout files whose name include the word Address, enter Address and click the Search button. All files with names such as Address J8562 or Address 003R96245 will be found and listed.
It's also possible to manually select the layout file needed.
Activate the Manual search check box in the lower-left corner and the list will be populated with all layout files found in Labeljoy's library, grouped by brand.
Note:
layouts are files with a .lpl extension positioned in Labeljoy's installation folders, under the Layouts sub-folder (normally C:\Program files\labeljoy\Layouts or C:\Program files (x86)\labeljoy\Layouts).
It is possible to create custom layout files and save them in this location, by using the File\Save as and selecting Layout in the File type combo box.
You can create your own layout library that will be shown in this screen, together with all other layout files present.
The second tab, Custom,enables you to define the following parameters:
Page: in this frame you can define physical paper size. The combo box enables you to select a standard format or, by selecting the last item user-defined, define custom paper sizes. By doing so, the text boxes Width and Height
will become enabled and will let you manually enter paper size values. Also, by acting on the combo boxes below, you can define paper orientation (horizontal
or vertical) and define the type of paper used (sheet
or fanfold). This last setting does not affect printing; it just instructs Labeljoy to draw on screen the typical fanfold paper holes present near the left and right edges of this type of paper (normally used with continuous feed dot-matrix printers). Note that the left and right margins must be at least 0.03 inches wide (7.5 mm) to enable the holes to be rendered on screen.
Labels: in this frame you can define the sheet layout, meaning the number of label rows and columns present on each paper sheet. You can also define the label shape.
Margins: in the Margins
frame you can define the inner paper dimensions used to calculate labels coordinates. The values set here, together with the number of rows and columns, will define label sizes. The values are:
Left margin: space between the left paper edge and the first label column.
Right margin: space between the right paper edge and the last label column.
Top margin: space between the top paper edge and the first label row.
Bottom margin: space between the bottom paper edge and the last label row.
Horizontal space: spacing between label columns.
Vertical space: spacing between label rows.
Boundary tolerance: space used outside label edges (if any) on which you want to enable printing.
The resulting label size will be shown in the lower side of the dialog box. A message will be shown in case the settings result in an invalid layout.
Note:
Sizes shown here will be in inches or centimeters according to the Unit of measure
setting defined in the User interface
tab of the Option
dialog box.
Inch fractions can be entered through a popup menu, as explained in the topic manage inch fractions.
The Watermark
tab enables you to load an image that will be displayed on screenonly, behind all elements.
The image loaded here will not be printed. Its only purpose is to
facilitate building label templates
to be used when you need to print on pre-printed forms.
The background image to be used here needs to be created by
scanning the original form, ensuring that the image is of good quality,
and the source form paper sizes are honored. See working with images
for details.
The Advanced tab
enables you to define additional information about the brand, model and a description of the current layout. Note that the text defined in the Model
field will be shown in the status bar.
It is also possible to define the rendering order with which the labels will be drawn on paper. By column, then by row (default) makes the rendering order proceed first horizontally, then vertically. For example, in a layout with 2 columns and 5 rows, labels will be rendered with the following order: column 1 then column 2 of row 1, column 1 then column 2 of row 2, column 1 then column 2 of row 3, etc.
Vice-versa, By row, then by column makes the rendering order proceed vertically, then horizontally. In the previous example, that would be: row 1 then row 2 then row 3 then row 4 then row 5 of column 1, row 1 then row 2 then row then row 4 then row 5
of column 2, etc.
Note:
This setting has effect on layouts made up of more than 1 row and more than 1 column
Also this functionality is useful only when a text counter is present or there is a data connection. Or when a partially used label sheet needs to be printed and the first columns are missing.
Finally, In this tab you can activate the Resize elements on layout change
global option: if this option is enabled, whenever the layout changes because of manual adjustments, all elements coordinates will be proportionally adjusted
to the new label size.
If the Resize Fonts
option is checked, all font sizes will be also be proportionally adjusted.
If the Resize page elements option is flagged, all page elements
will also be resized accordingly.
Note:
Labeljoy is deployed with more than 6,500 precompiled layout files
with the layout definitions of
the most popular brands. The layout files are copied
during program installation
in the installation folder, inside the Layout
sub folder, and are organized by brand name.
In case the layout defined here will generate partially printed sheets in the bottom area, due to printer limitations, you might consider sub-dividing the layout into two separate layouts. See automatic layout partitioning
for details.
The layout dialog box enables you to load a layout file. By clicking the Load file
button you will be prompted with a standard Open file
dialog box that will enable you
to select a file
with the extension lpl, Labeljoy's layout file extension. Once the layout file is loaded, click Apply
to see it applied to the underlying job.
Note:
When the new layout is applied to the current job, the number of labels per page may change according to the new settings in the Rows and Columns fields. If the current job is not connected to a data source, then labeljoy might ask you if you need to adapt the current label number to the new layout.
To provide the best experiences, we use technologies like cookies to store and/or access device information. Consenting to these technologies will allow us to process data such as browsing behavior or unique IDs on this site. Not consenting or withdrawing consent, may adversely affect certain features and functions.
Functional
Always active
The technical storage or access is strictly necessary for the legitimate purpose of enabling the use of a specific service explicitly requested by the subscriber or user, or for the sole purpose of carrying out the transmission of a communication over an electronic communications network.
Preferences
The technical storage or access is necessary for the legitimate purpose of storing preferences that are not requested by the subscriber or user.
Statistics
The technical storage or access that is used exclusively for statistical purposes.The technical storage or access that is used exclusively for anonymous statistical purposes. Without a subpoena, voluntary compliance on the part of your Internet Service Provider, or additional records from a third party, information stored or retrieved for this purpose alone cannot usually be used to identify you.
Marketing
The technical storage or access is required to create user profiles to send advertising, or to track the user on a website or across several websites for similar marketing purposes.
 The first tab, Layout search, enables you to search for existing layout file inside the Layout folder in Labeljoy's installation path.
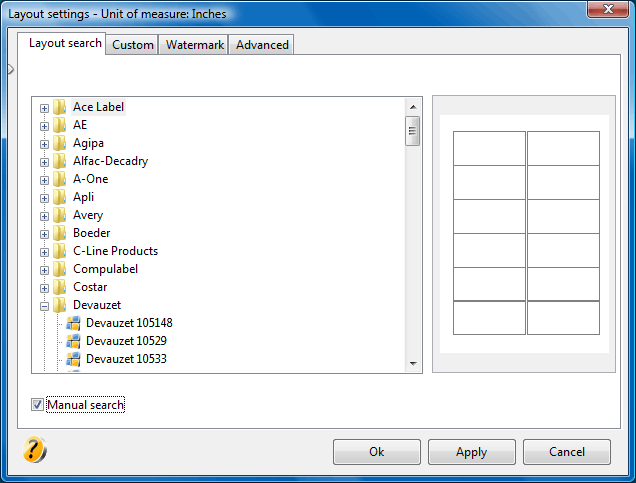 It's also possible to manually select the layout file needed.
 The second tab, Custom,
enables you to define the following parameters:
The second tab, Custom,
enables you to define the following parameters: The Watermark
tab enables you to load an image that will be displayed on screen
only, behind all elements.
The Watermark
tab enables you to load an image that will be displayed on screen
only, behind all elements.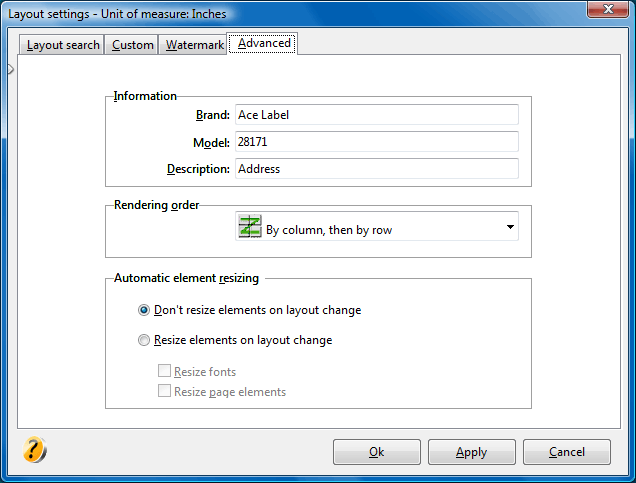 The Advanced tab
enables you to define additional information about the brand, model and a description of the current layout. Note that the text defined in the Model
field will be shown in the
The Advanced tab
enables you to define additional information about the brand, model and a description of the current layout. Note that the text defined in the Model
field will be shown in the 